Manually backup database
One of the main advantages of having your own VPS is the ability to make things by yourself, In this short post I’m gonna show you how to make a backup of your WordPress website database by using the Mysql DUMP tool, you’ll see that it really is a piece of cake.
The only thing you need to know is the database name, so first of all login into mysql, see command below:
Login into MySQL
mysql -u root -pThis command tells MySQL that you are going to login as the user (-u) “root” and for that you’ll provide its password (-p).

Immediately after entering the root’s password you will be able to execute mysql commands.
Show Databases
show databases;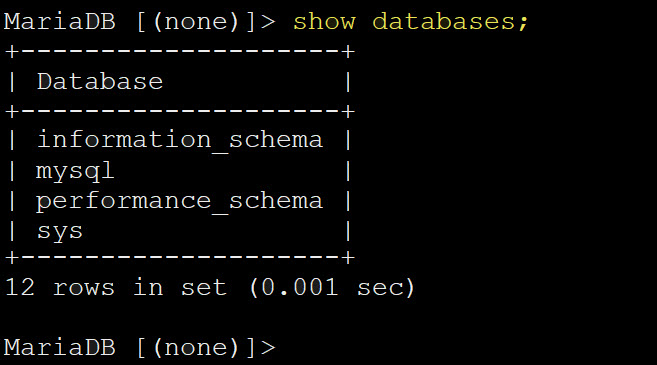
You’ll see all the databases on the list, just take note of the one you want to backup.
Export (backup)
Let’s pretend we do have one database called “people“, so the backup command will be as follow:
mysqldump -u root -p people > people-bkp.sqlThe backup file that will be generated will be available in the directory where you were at the moment you logged into Mysql, feel free to download that file to have it on another place as a true backup.
Import (restore)
Later in the future you may want to restore that file into an empty database you’ve just created.
mysql -u root -p -h localhost woo < woo-bkp.sqlWhat else you’ll need
What you have done so far is a backup of the MySQL database, that’s great but is not the only thing you’ll need if you want to have a complete wordpress site backup. As you probably know the .sql file doesn’t contain any media file, no images nor videos, it only contain a reference to them in the form of a path.
Files and folders backup
Actual files along with your wordpress directory structure must be saved separatedly, I usually create a compressed file containing everything from the root (/) directory, see the command below:
tar -cvzf /var/www/people-bkp.tar.gz *If node_modules is a subdirectory inside another folder:
tar -cvzf /var/www/mmnreact-bkp.tar.gz --exclude="*/node_modules" *tar -cvzf /var/www/mmnreact-bkp.tar.gz --exclude="*/node_modules" --exclude="*/.git" --exclude="*/dist" *You won’t be able to save the .tar.gz file inside the directory you are making the backup, in the example below I execute this command being located on my wordpress website root (/) directory but the generated file will be saved one level above inside the /var/www/ directory.
Running tar from inside
If you want to run the command inside /var/www/customers.nginx.encasa/client itself, exclude node_modules like this:
cd /var/www/customers.nginx.encasa/client/tar --exclude='./node_modules' --exclude='./.git' -czvf /var/www/[XXXXXXX].tar.gz .cd /var/www/customers.nginx.encasa/server/
tar --exclude='./node_modules' -czvf /var/www/server.tar.gz .Verify Exclusion
After creating the archive, you can list its contents to confirm node_modules is excluded:
cd ../../
tar -tzvf client.tar.gz | grep node_modulesIf nothing shows up, the exclusion worked!
cd ../../
tar -tzvf server.tar.gz | grep node_modulesIf nothing shows up, the exclusion worked!
Files and folders restore
Later in the future you may want to restore your website files and folders from the .tar.gz file, then you can use the following command:
tar xvzf people-bkp.tar.gzThe letter “x” used in this command stands for “extract”, just be sure you are once again in the root(/) directory of your WordPress website before executing this command, the magic will happen and you will see all the files and folders re-build having also its ownership and permissions, awesome!
Changing domain name
WordPress does not need to be installed when transferring files from another server (tar.gz & .sql); you only need to import the .SQL file, for which MariaDB must already be installed. A new database must be created, which will obviously be empty at first — meaning it contains no tables.
On the other hand, WordPress needs PHP (FPM for NginX) and all the additional modules already installed and tested using phpinfo.php.
sudo apt update
sudo apt install -y php-fpm php-mysql php-curl php-gd php-mbstring php-xml php-xmlrpc php-soap php-intl php-zipAfter transferring the files and folders, make sure that wp-config.php has the correct credentials and database name, along with the charset and collation settings.
If the website’s domain also changed during the server migration, don’t forget to update the HOME and SITE URL values in the WP_OPTIONS table.
First check current values
SELECT option_name, option_value FROM wp_options WHERE option_name IN ('home', 'siteurl');
UPDATE wp_options SET option_value = replace(option_value, 'http://www.oldurl', 'http://www.newurl') WHERE option_name = 'home' OR option_name = 'siteurl';Backup Let’s Encrypt SSL Certificates
cd /etc/nginx/ssl
Leave a Reply